This Dutch oven carnitas recipe is the one I make when people are coming over and I want to look like I tried way harder than I did.
Carnitas are basically a cheat code. You buy one big, cheap cut of pork, season it, and then walk away while the oven does four hours of unsupervised heavy lifting. What comes out the other side is fork-tender pork with crispy, caramelized edges and just enough citrus and cumin to make everyone think you've been laboring all day. You haven't. You folded laundry.
I make these on repeat - taco night, a hungry crowd, meal prep for a week of lazy lunches. One pork shoulder feeds a small army, and the leftovers somehow get better by Tuesday.
Quick honesty, because I'm a chef and it matters to me: traditional carnitas are confit - pork slowly simmered in its own lard until it crisps. It's incredible. It's also a lot of lard and a lot of fuss for a Tuesday. My version braises the pork in citrus, stock, and aromatics, then crisps it under the broiler. Not strictly authentic. But for a home kitchen, it's easier, a little leaner, and honestly hard to beat. Let's go.
Jump to:
Why This Dutch Oven Carnitas Method Works
A few things make this Dutch oven carnitas recipe work, and they're worth understanding before you start. Get these right and your carnitas will turn out every single time.
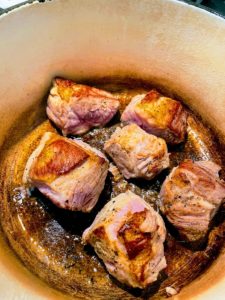
The sear isn't optional-optional. Browning the pork in small batches builds the deep, savory crust that flavors the entire braise. Crowd the pan and you steam instead of sear - gray meat, no flavor. A little patience here pays you back in every bite.
The braise does the tenderizing. Pork shoulder is loaded with collagen and connective tissue. Low, slow, moist heat melts all of that into gelatin, which is exactly what gives you that melt-in-your-mouth texture. You can't rush it. Three to four hours is the price of admission.
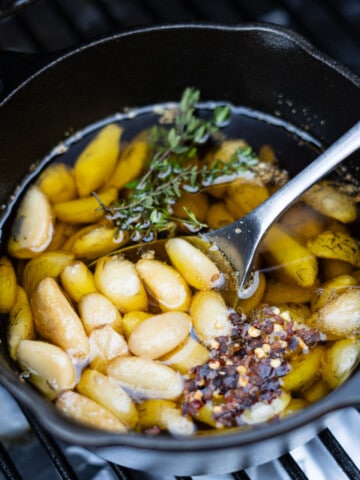
The reduction is the secret. Most recipes toss the braising liquid. Don't. Reducing it by about 75% concentrates everything into a glossy, intense sauce that you pour right back over the meat. That's flavor you already made - use it.
The broil is the finish. A quick blast under the broiler crisps the edges and caramelizes the sugars in the sauce. This is what separates "pulled pork" from actual carnitas.
Equipment
This recipe really wants a large Dutch oven - it sears on the stovetop and braises in the oven without dirtying a second pan. You do not need a $300 Le Creuset. A solid enameled option in the $40-$50 range will get the job done beautifully.
Ingredient Notes
Full amounts for this Dutch oven carnitas recipe are in the recipe card below, but here's what actually matters when you're shopping.
Pork shoulder (a.k.a. Boston butt). Don't substitute a leaner cut here. The fat and connective tissue are the whole point - they break down into tenderness. Pork loin will leave you with dry, sad carnitas. Boneless is easier to cube; bone-in works if you don't mind a little knife work.
Orange juice. Classic carnitas lean on orange for a subtle sweetness that balances the rich pork. Fresh-squeezed is lovely, but no shade if you reach for the carton.
Mexican oregano, if you can find it. It's more citrusy and floral than the Mediterranean oregano in your pantry, and it's worth grabbing. Regular oregano works in a pinch - it's just a slightly different flavor lane.
Chicken stock. Builds the braising liquid into something with backbone. Broth works fine too - same job, slightly lighter body.
📖 How to Make This Dutch Oven Carnitas Recipe
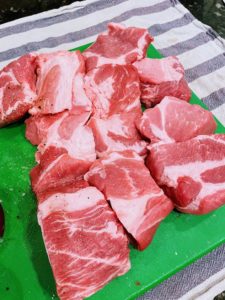
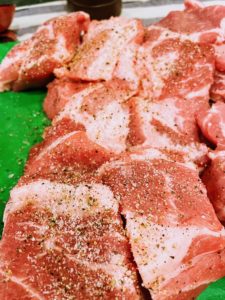
Cut your onion into large chunks, cutting through the root so the wedges hold together during cooking. Then cube the pork shoulder into 2-3″ pieces, keeping them similar in size so they cook evenly. Season generously with kosher salt and fresh ground pepper.

Searing
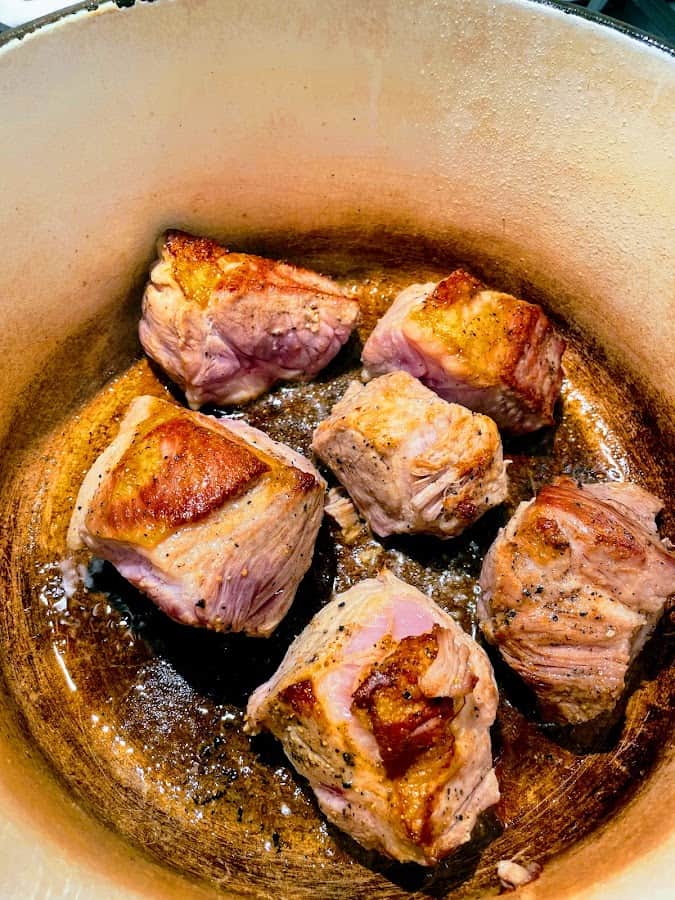
Heat your Dutch oven on high and add the olive oil. Work in small batches - overcrowding drops the temperature and steams the meat instead of browning it. Add the pork and don't touch it. Let it sit 3-4 minutes until it releases from the pan on its own with a deep golden crust, then flip. Once browned on the second side, set aside and repeat.
This step is technically optional, but it's the single easiest way to level up the whole dish. The browned bits left in the pot become the foundation of your sauce.
Braising
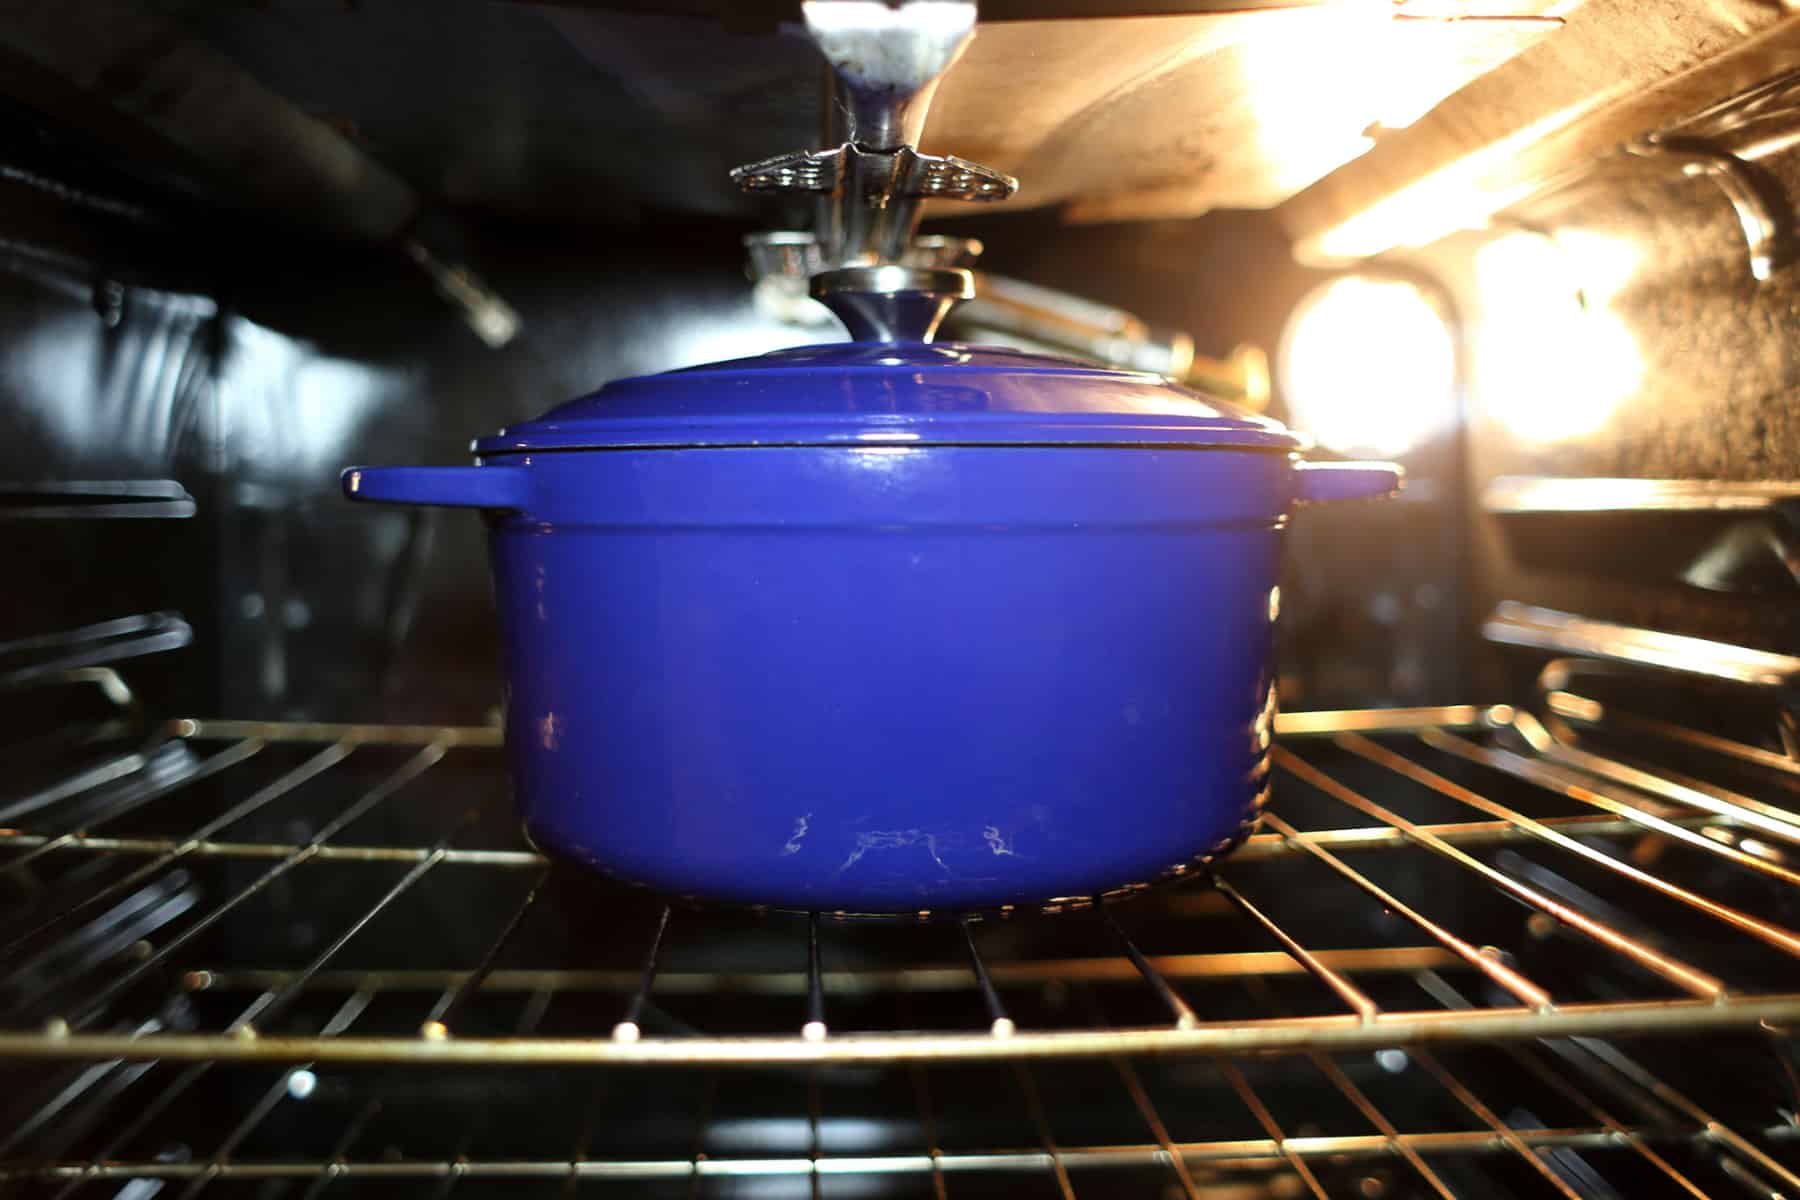
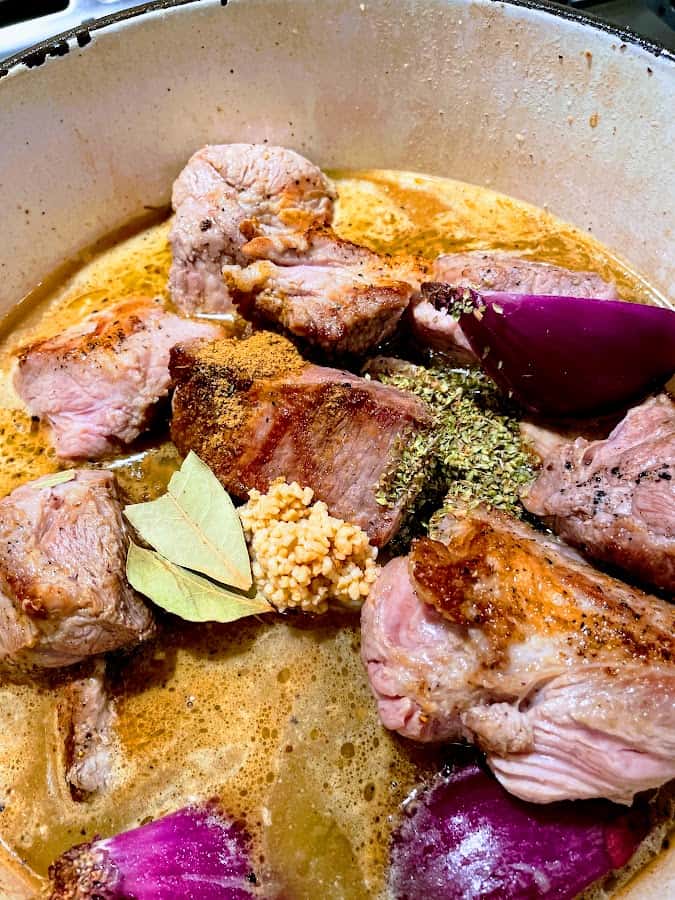
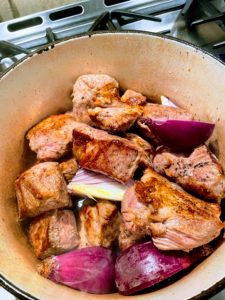
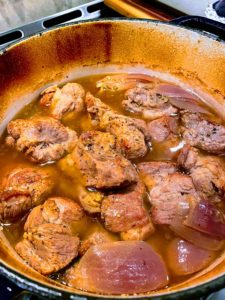
Return all the pork to the Dutch oven along with the red onion and garlic. Add the orange juice, chicken stock, cumin, oregano, and bay leaves, and stir until everything is distributed. Bring it to a simmer, then cover with a lid (I like to lay foil over my lid so it stays clean).
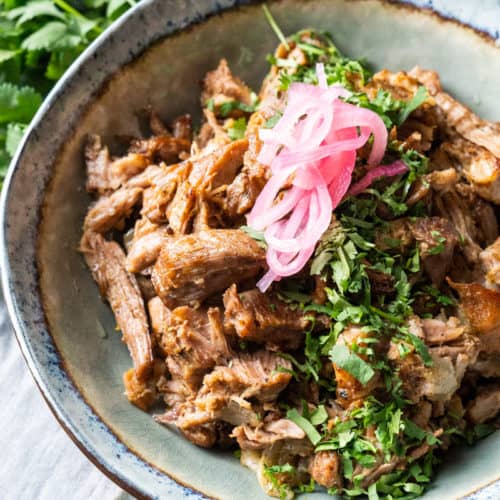
Move the pot into a preheated 350°F oven and let it cook 3-4 hours, until the meat is fork-tender. This slow stretch is where the connective tissue breaks down into those soft, bite-size pieces. When it's done, lift the pork out with a slotted spoon into a deep Pyrex-style dish and cover to keep warm.
Reducing & Crisping
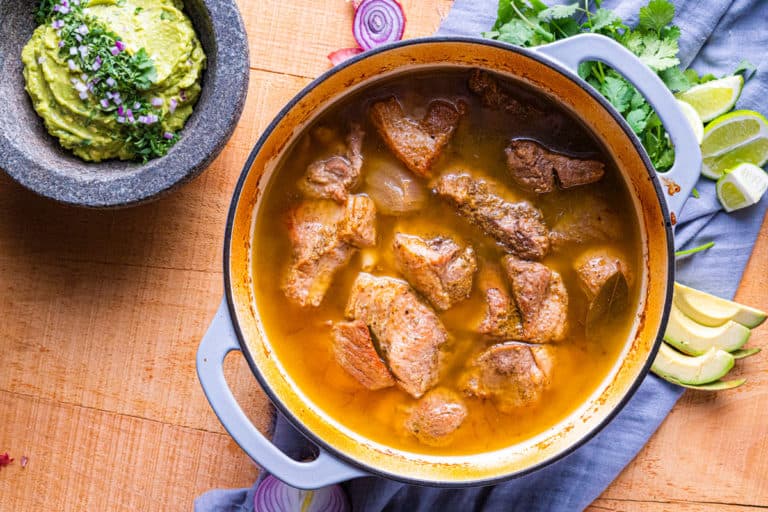
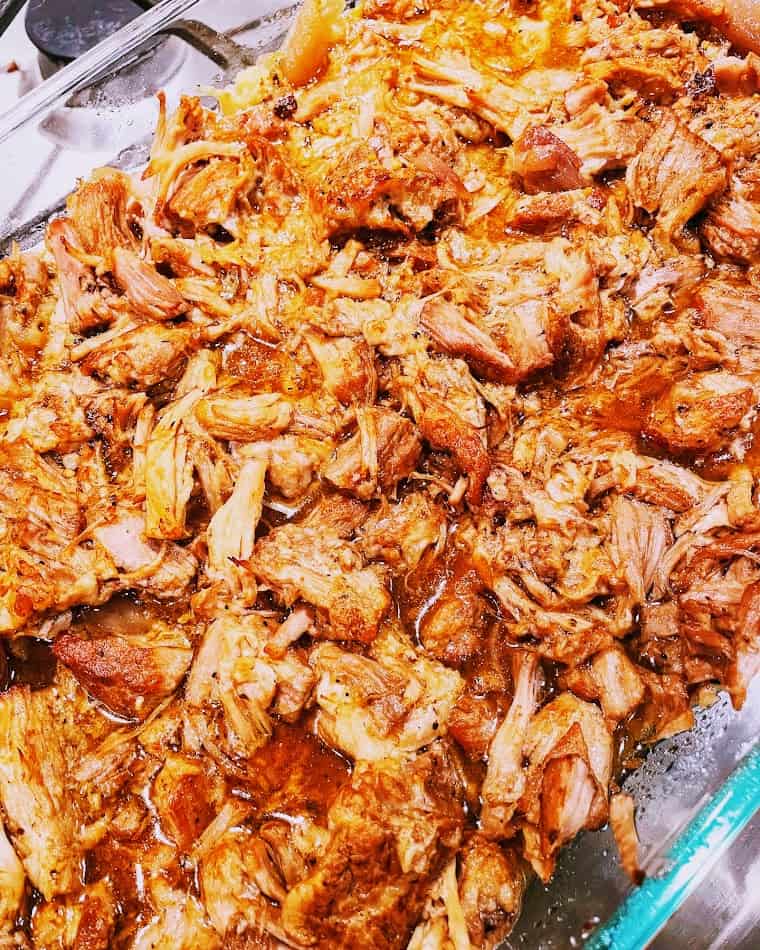
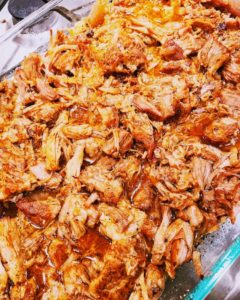
Set the pot of leftover braising liquid back on the stovetop and reduce it by about 75%, until thick and glossy. Pour that concentrated sauce over the pork, mixing and breaking the meat into smaller pieces as you go.
For the finishing move, slide the saucy pork under the broiler for just a minute or two to crisp the edges and caramelize the sugars in the sauce. Watch it like a hawk - it goes from perfect to burnt faster than you'd believe.
🎥 Video
Here's a quick walk-through of each step so you can see exactly what you're getting into.
Common Dutch Oven Carnitas Mistakes (and How to Fix Them)
My pork came out dry. Almost always means a leaner cut or not enough cook time. Shoulder needs the full braise to break down - if it's tough, it's usually undercooked, not over. Give it more time.
No crispy edges. Two culprits: the liquid wasn't reduced enough (too watery to crisp), or the broiler time was too short. Reduce hard, then broil with your eyes glued to the oven.
It's greasy. Skim some fat off the braising liquid before you reduce it, or chill the liquid and lift the solidified fat right off the top.
It burned under the broiler. Been there. The broiler goes from perfect to charcoal in under a minute. Do not walk away. Do not check your phone.
Chef Tip for Dutch Oven Carnitas
The browning step builds flavor that no amount of spice can replace. It's a little tedious, sure, but it's the difference between good carnitas and the kind people remember. Don't skip it.
Building Your Plate (or Bowl)
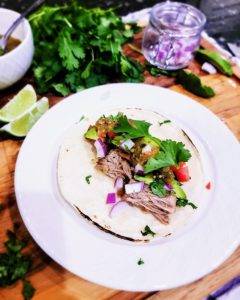
This is where carnitas earn their keep - they go with almost everything. Tuck them into lightly toasted corn tortillas for carnitas street tacos, pile them over a rice bowl, or spoon them onto a salad. You really can't go wrong.
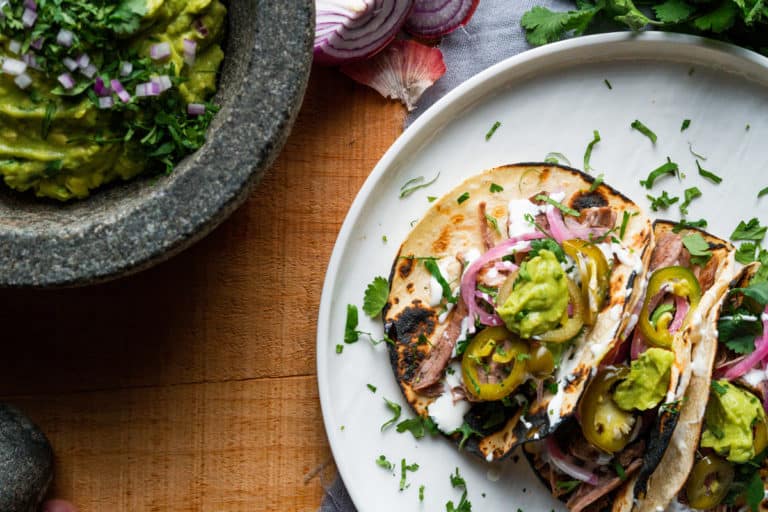
For toppings, reach for salsa, avocado, sour cream, and fresh cilantro, with a squeeze of lime to brighten it all up. A batch makes enough to enjoy a different way every night of the week.
What to Serve With Dutch Oven Carnitas
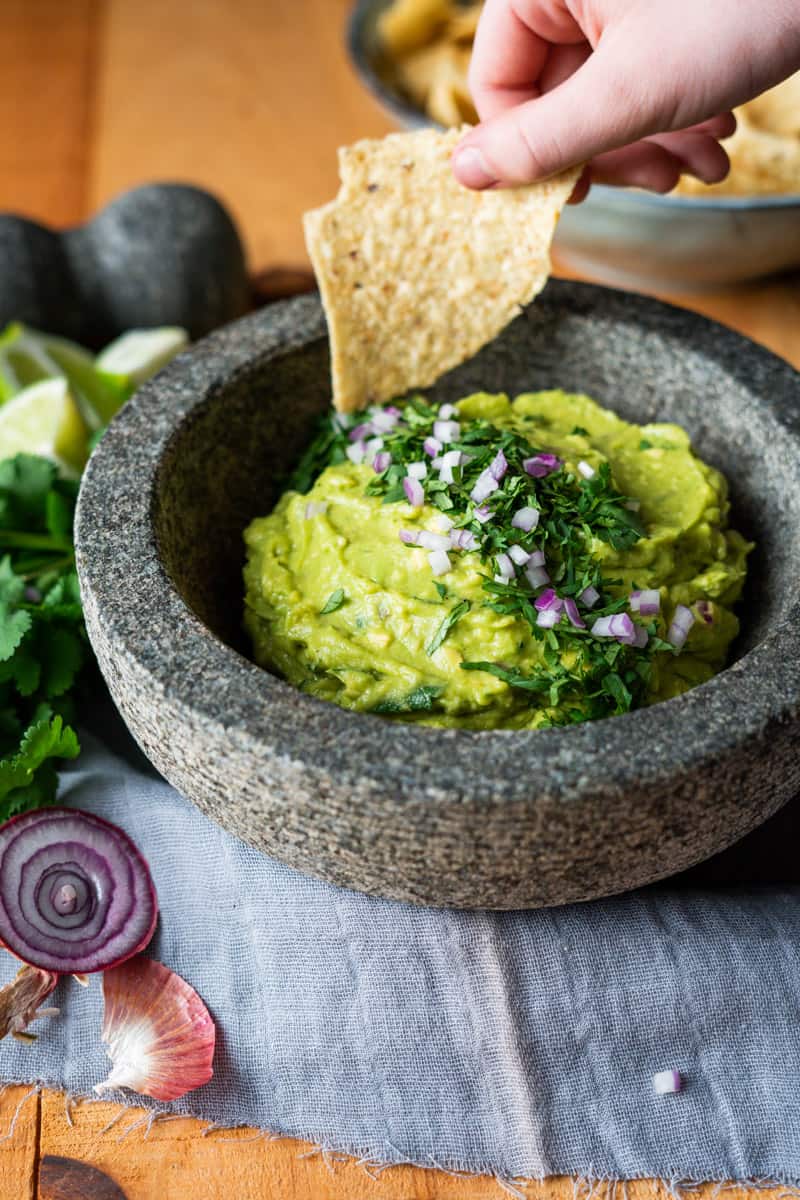
Whenever we make carnitas, a few things show up alongside it on repeat. Homemade guacamole is a given. Our light brown rice, finished with a little lime and cilantro, rounds out the whole meal. If you want to geek out on the tradition behind the dish, the history of carnitas is worth a read before you make this Dutch oven carnitas recipe your own.
And we keep pickled red onions and pickled jalapeños in the fridge at all times. Seriously - if we start running low, I make another batch. They're too easy and too good to live without, and they add a bright, tangy pop that cuts right through the rich pork.
Make-Ahead & Freezing Dutch Oven Carnitas
Carnitas are a meal-prep dream. The flavor actually deepens overnight, so making them a day ahead is a feature, not a compromise.
Make-ahead: Cook through the reduction step, store the pork in its sauce in an airtight container, and refrigerate up to 4 days. Crisp it under the broiler right before serving.
Freezing: Freeze the saucy pork (before broiling) up to 3 months. Thaw overnight in the fridge, then reheat and crisp.
Reheating: Add a splash of stock or reserved cooking liquid to keep things moist, warm gently, then broil to bring the crispy edges back to life. I put together a full guide on how to reheat pork carnitas (and store them properly) - worth a read if you're planning leftovers.
Carnitas FAQ
What cut of pork is best for carnitas?
Pork shoulder, also sold as Boston butt, is the gold standard. Its high fat content and connective tissue break down during slow cooking to give you tender, juicy meat. You can use pork loin, but it's much leaner and will come out drier.
Can I make carnitas in a slow cooker or Instant Pot?
Yes to both. You'll still get tender meat - just adjust the cooking time for your appliance. My one strong recommendation: still brown the pork in a pan first, then deglaze that pan with a little stock so you don't lose those flavorful browned bits. And reduce the liquid on the stovetop at the end for the best sauce.
Do I have to add orange juice?
Orange juice adds a hint of sweetness and acidity that balances the rich pork, so I recommend it. If you're out, substitute another citrus - use much less lime, since it's sharper. Try 1 tablespoon lime + 1 tablespoon sugar + ½ cup water as a stand-in.
Can I use chicken broth instead of stock?
Absolutely. Stock has a slightly richer body, but broth does the same job of building the braising liquid. Use what you've got.
Why aren't my carnitas crispy?
Usually the braising liquid wasn't reduced enough before going back over the meat, or the broiler time was too short. For crispy edges, reduce the sauce until it's thick and glossy, then broil - watching closely - until the edges caramelize.
Can I add other spices?
Of course - make it yours. Chili powder, smoked paprika, garlic powder, or a pinch of cinnamon are all great additions depending on the flavor you're after.
📖 Recipe
Dutch Oven Carnitas
Equipment
Ingredients
- 4 pounds Pork Shoulder - boneless is easier
- 3 tablespoon Olive Oil
- Kosher Salt
- Fresh Ground Pepper
- ½ cup Orange Juice
- 1 quart Chicken Stock
- 1 Red Onion
- 2 Bay Leaf
- 2 teaspoon Cumin
- 2 teaspoon Oregano
- 1 tablespoon Garlic
Instructions
- Prep your onion by cutting it into ⅛ths, cutting through the root of the onion. This way the root will hold the onion together a bit. Set Aside.
- Cube the pork shoulder into chunks around 2-3" cubed. The more similar in size, the more evenly they will cook.

- Season the first batch (6-7 pieces) of pork liberally with kosher salt and fresh ground pepper.
- Put your
- Add pork to the pan and DON'T move it around. Let it sit for 3-4 minutes or until it releases from the pan by itself and has a nice golden brown color.
- Flip each piece, but don't stir/move them all around. Just a simple turn over.
- Once they have browned on the second side, remove and set aside.
- Repeat this process until all your pork has been browned.
- Once all your pork has finished browning, return it back to the dutch oven with the red onions.
- Add orange juice, chicken stock, cumin, oregano, and bay leaves. Mix until distributed.
- Bring to a simmer and then cover with the lid. (I like to put foil on my lid so it doesn't get as dirty).
- Move to 350-degree oven for 3-4 hours or until fork tender.
- Once fork tender, remove the pork and put it into a deep-sided pyrex style dish, and cover to keep warm.
- Take the remaining liquid in the pot and put it back on the stove to reduce it by about 75% or as much as you can without burning.
- Once thick, pour that delicious liquid back over the pork. Mixing together and breaking the pork into smaller pieces at the same time.

- Turn the oven on broil, and put the pork mixture back in the oven for just a minute or two. DO NOT TAKE YOUR EYES OFF IT. It will go from perfect to burnt in less than 1 minute. Note: this whole step is optional if it seems scary.
- Enjoy with corn tortilla, avocado, and anything else that makes your soul happy.

Video
Notes
- This can be crockpot friendly but only to a certain point. I 100% recommend still browning the pork in a pan, and then deglazing the pan (adding some chicken stock to get all the brown bits off the bottom). Reducing the liquid at the end is still an option, but you'd need to transfer that liquid back into a pot on the stove.
- If you don't have a dutch oven, I would recommend looking into one. You do NOT need to spend $300+ on a Le Creuset. I have a link to a dutch oven that's under $50 here.
- You don't have to broil the reduced liquid if you don't have time or are nervous, but it browns the remaining sugars in the sauce and gives it a little crispy texture at the same time. I recommend trying it at least once.
- Don't snack on the pork the whole time the sauce is reducing. It's a rookie mistake and you won't be hungry for dinner. I have learned this lesson many many times.