
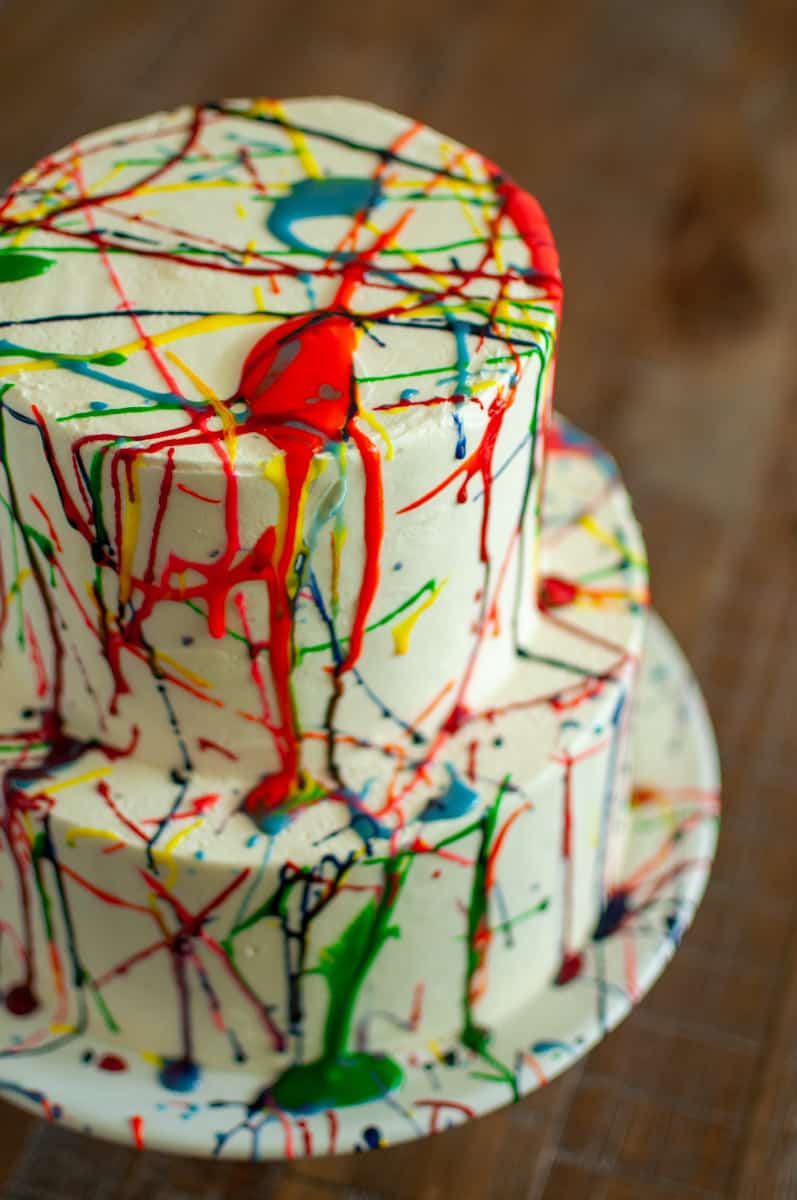
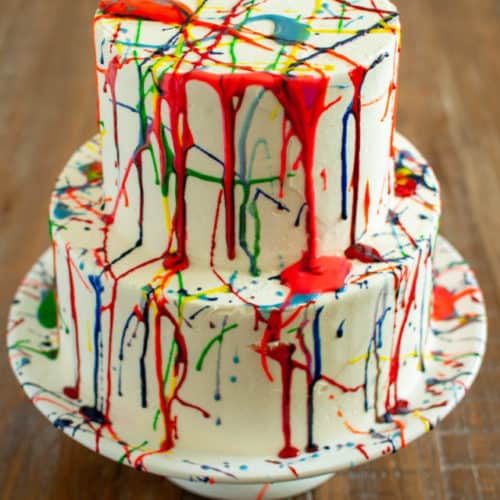
If you are thinking about or planning a splatter paint party and you are looking for the perfect idea for a cake, you've found it! I'll walk you through everything I used to make this cake come to life as well as some videos of what the process looked like.
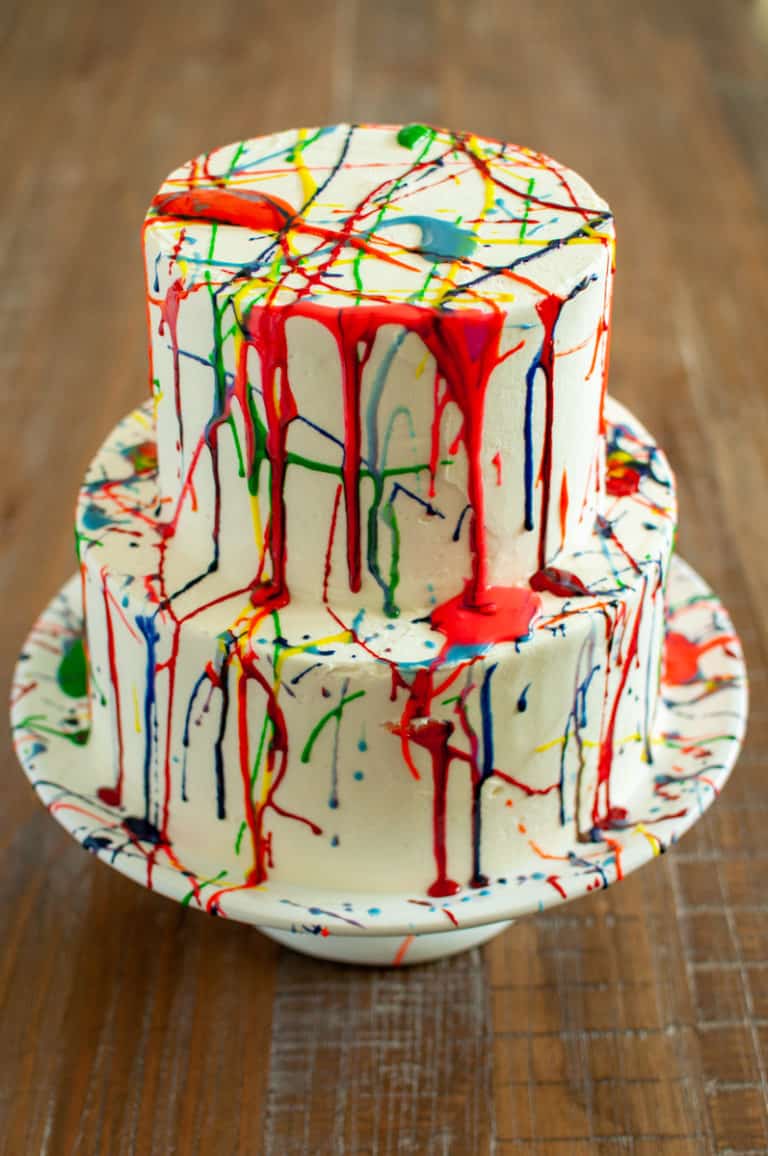
Every year, I let my kids design the cake they want for their birthday. This year my daughter picked a splatter paint party, and the cake design she came up with was right on brand. What made the situation slightly harder, but also absolutely made the most sense is that she wanted to splatter paint it herself. It was her birthday cake after all.
How Do You Make a Paint Splatter Cake?
Making a paint splatter cake is easier than it looks! Here's the quick version:
- Bake and frost a white cake with smooth white buttercream as your "canvas."
- Chill the frosted cake for at least 30 minutes so the splatter colors don't bleed.
- Mix royal-style frosting in 4-6 bright colors using gel food coloring.
- Splatter using a clean paintbrush - flick the bristles toward the cake from a few inches away.
- Protect your space with drop cloths or parchment paper because food dye stains everything.
Total time: about 2 hours including baking, plus chill time. Skill level: beginner-friendly with the right setup. Keep reading for the full tutorial below.
Jump to:
- How Do You Make a Paint Splatter Cake?
- 🛒 Ingredients for Splatter Paint
- 🍰 The Cake Base
- ⏲ Shortcut
- 🧁The Frosting
- 👩🏼🍳 Chef Tip
- 💧Protecting Your Space
- Common Paint Splatter Cake Mistakes (and How to Fix Them)
- What Kind of Cake Works Best for a Splatter Cake?
- How Do You Splatter Paint a Cake Without Making a Mess?
- What Colors Work Best for a Paint Splatter Cake?
- Can You Make a Paint Splatter Cake Ahead of Time?
- Frequently Asked Questions
- 📖 Recipe
- 💬 Comments
🛒 Ingredients for Splatter Paint
- Powdered Sugar
- Water
- Food Coloring
I did a very basic royal frosting to make the splatter paint. In small bowls or cups, mix about ½ cup of powdered sugar with the food coloring of your choice, and ½ teaspoon of water at a time until it drips in thick ribbons.
If your frosting is too thick it dollops instead of splatters. If it's too thin, it looks like watery drips instead of sticking in a thick pattern.
🍰 The Cake Base
I used my tried and true, always well-loved Vanilla Cake recipe. The only special thing she asked for was to also have some pops of color inside, so I used some leftover Unicron sprinkles from last year's party to give it a funfetti flair.
⏲ Shortcut
Go to your local bakery or grocery store and order a plain white buttercream cake if you are nervous about the actual cake-building side but still want the fun of decorating it yourself.
This shortcut can save you a ton of time and stress you if are a beginner baker, and leave you with just the fun splatter painting part.
🧁The Frosting
For the main white frosting on the cake, I used a simple American-style vanilla buttercream. It's simple, easy, delicious, and can easily be modified to any flavored extract you are looking for. For example, my daughter actually wanted lemon frosting, so I just added a tablespoon of lemon juice at a time until it was nice and lemony.
👩🏼🍳 Chef Tip
I HIGHLY SUGGEST practicing before you go full-on at the cake. I used some of the leftover cake frostings and haphazardly frosted an upside-down cup. The same spoons I mixed the colored frosting with, drizzled and splattered. See the video in the recipe below!!
💧Protecting Your Space
As you can imagine this got messy fast and food dye stains. I made my daughter's apron up to protect her, but I also completely covered the space she was working on with parchment. A plastic tablecloth, newspaper, anything will really work.
I also however built a backstop to catch anything she flung too hard by taping together some old cake boxes I have. A cardboard box cut open would have also worked. Using some painter's tape, I just taped it straight on the counter and it worked PERFECTLY.
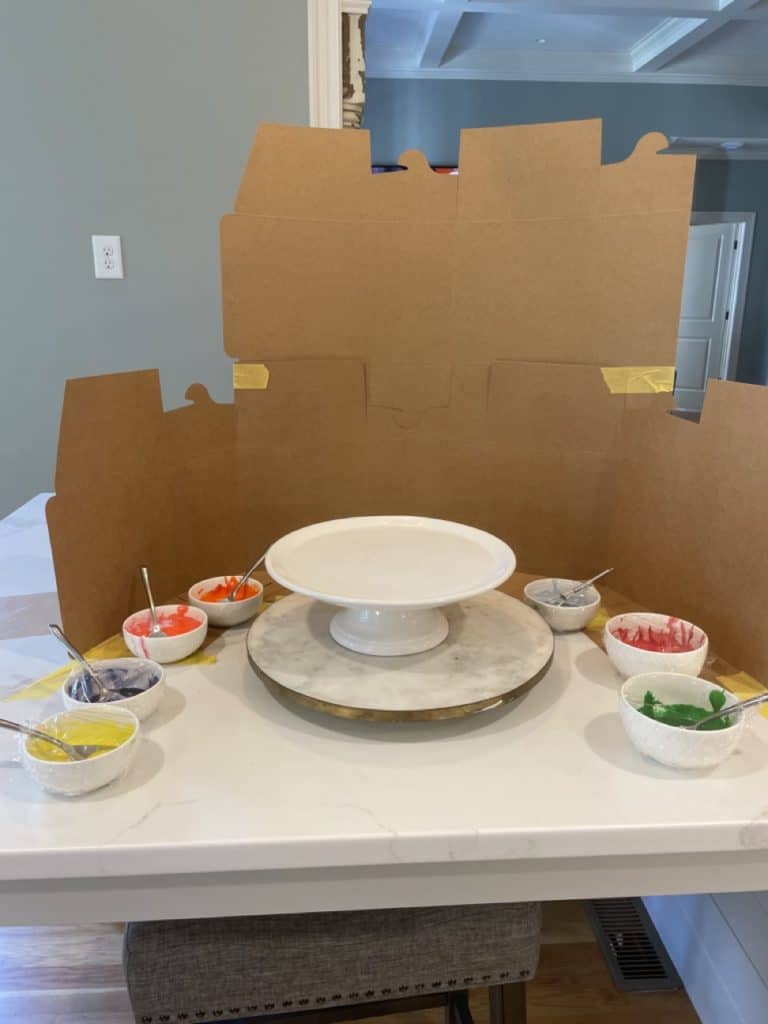
That chair under the island should have been covered and it was a mistake on my part. Learn from me, and remove any and all things that you would be sad to have frosting all over it. My floor also got decently covered which wasn't a huge deal, but if you have floors that are white oak or could possibly absorb any dye, I would highly suggest covering those as well.
Needless to say, this was a home run. Not only because it looked super cool, but because it was HER creation. Her art. Did I need to put my OCD to the side a little and just let her go... Yes. Was it hard... Yes. Any regrets? Only about not moving that chair, haha.
If you are wondering if you can do this, the answer is yes. Have fun, and be creative!
Common Paint Splatter Cake Mistakes (and How to Fix Them)
A few things I learned the hard way so you don't have to:
Splatter that runs and bleeds. Your frosting is too thin. Add a tablespoon of powdered sugar at a time until it forms a thick ribbon when you lift the spoon. Liquid food coloring is also the culprit here - gel only.
Splatter that lands as blobs instead of streaks. Frosting is too thick. Add water ¼ teaspoon at a time. You're aiming for the consistency of warm honey.
Muddy-looking colors. Either you used liquid coloring (it desaturates everything) or you mixed too many bowls with the same spoon. One spoon per color, no exceptions.
Splatters smudging when you move the cake. The base frosting wasn't chilled enough. Always chill the white-frosted cake at least 30 minutes before splattering, and let the finished splatter set another 20-30 minutes before transferring.
The colors look chaotic, not artistic. You used too many. Stick to 4-6 colors max - and ideally pick a palette (primary, neon, pastel, rainbow), don't grab everything from the food coloring drawer.
What Kind of Cake Works Best for a Splatter Cake?
A white or vanilla cake with white buttercream frosting is the gold standard. The reason is simple: the white background lets your splatter colors absolutely pop. Anything tinted or chocolate will mute the colors and reduce the dramatic visual effect.
For the cake itself, a sturdy white or vanilla butter cake holds up well to chilling and handling. If you want a shortcut, a high-quality boxed mix works perfectly - your splatter art is the star here, not the cake recipe.
How Do You Splatter Paint a Cake Without Making a Mess?
Honest truth: this WILL get messy. But you can control it with a few key prep steps.
- Drop cloth EVERYTHING within 4-5 feet of your cake - floor, walls, nearby furniture. Food dye stains permanently.
- Build a backstop with cardboard or a tri-fold board behind the cake to catch overspray.
- Wear an apron you don't care about (or do this outside!).
- Chill the cake first - splatters land cleaner on cold, firm frosting and won't smudge.
- Use the right consistency - frosting that's too thick blobs instead of splatters, too thin and it runs.
What Colors Work Best for a Paint Splatter Cake?
Use 4-6 colors maximum. Any more and it starts to look chaotic instead of intentional. The classic combos:
- Primary colors (red, blue, yellow) + black for a modern art look
- Neon brights (hot pink, electric blue, lime green, neon orange) for kids' parties - perfect for a neon splatter cake
- Pastels (mint, blush, lavender, pale yellow) for a softer, more sophisticated vibe
- Rainbow (red, orange, yellow, green, blue, purple) for a happy, celebratory feel
Always use gel food coloring, not liquid. Liquid food coloring waters down your frosting and makes it run. Gel keeps the consistency thick enough to splatter properly while delivering vibrant color.
Can You Make a Paint Splatter Cake Ahead of Time?
Yes! You can make a paint splatter cake up to 2 days ahead. Once the splattered frosting has fully set, store the cake in a covered container in the refrigerator. Bring it out about an hour before serving so the cake comes to room temperature - cold cake is dense and dry. The same advance-prep mindset works for entertaining boards - see my Make-Ahead Charcuterie Board guide for the night-before playbook.
Pro tip: if you're transporting the cake, do the splatter painting AT THE PARTY location if possible. Splatter paint can crack or smudge in transit, especially over bumpy roads.
Frequently Asked Questions
A paint splatter cake is a decorated cake where colored frosting is flicked or splattered across a smooth white frosted base, creating an abstract art look that resembles a Jackson Pollock painting. It's especially popular for birthday parties, art-themed events, and kids' celebrations.
Plan for about 2-3 hours total: 1 hour to bake and cool the cake, 30 minutes to frost and chill, 30 minutes for the splatter art, plus another 30 minutes to set. The actual splattering only takes 10-15 minutes - most of the time is waiting for things to cool or chill.
No fancy tools needed! You just need a few small bowls for mixing colored frosting, gel food coloring, and clean paintbrushes (designate them as food-only). Some bakers use spoons to flick the frosting instead of brushes - both methods work well.
Absolutely - it's one of the BEST kids' birthday cakes because they can help make it. Many parents (myself included) let the birthday kid do the splattering themselves, which becomes part of the party activity. Just protect the surrounding area first!
A drip cake has frosting or ganache running down the SIDES of the cake in controlled drips from the top edge. A splatter cake has random, scattered splotches all over the top and sides created by flicking thin frosting onto the surface. Splatter is messier but more abstract and artistic looking.
Yes for the white base frosting - store-bought buttercream works fine. For the colored splatter, you'll want to make your own thinner royal-style frosting because it splatters cleaner. Mixing gel food coloring into store-bought frosting can be done but the consistency is harder to control.
📖 Recipe
Splatter Paint Frosting
Equipment
- Small Bowls one for each color
- Spoons one for each color
Ingredients
- ½ cup Powdered Sugar
- ½ teaspoon Water
- Food Coloring - as needed
Instructions
- Using one small bowl for each color, add ½ cup of powdered sugar to each bowl.
- Add ½ teaspoon of water to start & the food coloring of your choice and mix until smooth.
- Depending on the amount of food dye needed, you may need to thin out your splatter paint frosting with ¼ teaspoon of water at a time or until thick ribbons form.
- When mixing, If your paint gets too thin or drippy add 1 tablespoon of powdered sugar at a time until you get back to a thick ribbon-like consistency.
- Splatter until your heart is content!

Tabetha Klein says
Just as a side note, this would be perfect for any paint themed birthday party! It was a fun and interactive way to tie in the splatter paint theme and could be modified to include everyone by making cupcakes for them to splatter or mini cakes! Hope you enjoyed it!
Tabetha Klein says
Perfect for my daughters paint themed birthday! She loved decorating it herself, and her friends thought it was really cool she did it herself.